
Related topics/ essential pre-reading:
- Fabric requirements- the All Business
- Pre-washing your fabrics, making a practice version and how to draft a pocket pattern
So how do we actually make a quilt coat?
First off, a few disclaimers :-) :
- The tutorials assume we are using a "normal" coat pattern (eg not one that is actually for a quilt coat like the Tamarack). If you are following a quilt coat pattern such as the Tamarack, you should follow the directions included in the pattern as they may have a different way of doing things.
- The following terms are used interchangeably:
- Quilt coat outer/ quilt top
- Quilt coat lining/ quilt backing
- The tutorials assume an understanding of standard quilting terms and concepts including piecing, quilt sandwich, basting and binding
If you haven't already, check out this IGTV video which gives you a high level overview as to how a quilt coat is made- it will provide you with some good context and background.

There are a few different options for getting our quilt coat pattern pieces ready for the All Business
The short answer:
- Option 1: Cut out our pattern pieces first, and then make your quilt sandwich and quilt
- Option 2: First make lots of mini quilt sandwiches and quilt (each is slightly larger than our pattern piece) and then cut out our pattern pieces
- Option 3: Make a larger "quilt" which is equivalent to the size of the fabric needed to fit all of your pattern pieces (refer to the Fabric requirements post for further instructions on this).
The longer answer
Option 1:
- Lay out your pattern pieces on your quilt coat outer piece of fabric and secure with either pins or fabric weights.
- Cut the pieces out.
- Take each of these pieces and create a quilt sandwich with a piece of batting and backing (quilt lining) which are slightly larger than the pattern piece.
- Baste and quilt as desired.
- Once you have quilted, you can then cut the batting and backing fabric to the same size as the pattern piece.
- Don't forget your pocket pieces! You should make these the same way as your other pattern pieces.
This is a relatively simple way of making a quilt coat, and is more efficient from a quilt top fabric use perspective ( as you can put each of your pieces very close together). However, you need to be careful when you are quilting in case it distorts the edges or changes the shape.

Option 2:
With this method, we will make lots of mini quilt sandwiches that are just slightly bigger than each of our pattern pieces.
- As an example, you may have an arm piece which is 25 inches long and 14 inches wide at widest point. You would then make two quilt sandwiches (one for each arm) with the quilt top (quilt coat outer) being say 27 inches by 16 inches and the backing and batting being slightly bigger. Or you could make one quilt sandwich for both the arms thats say 27 inches by 32 inches (to fit both arm pieces).

- Baste and quilt as desired.
- You can then lay your pattern pieces on each of your mini quilts, attach with either weights or pins and cut out each piece.
- Don't forget your pocket pieces! You should make these the same way as your other pattern pieces.

To ensure you have enough fabric, you may want to lay out your pattern pieces on your quilt coat outer first and then cut around each one, leaving a border so you have room to move.
Out of the two options, this one is probably slightly easier but not as efficient from a fabric perspective!
Option 3:
With this option, we are essentially making a quilt sandwich which is the size of the fabric needed (less the back piece which we have already made. This may be a good option if the fabric you are using is a wider WOF (eg 54-60") because otherwise you will either end up with a very long and skinny quilt, or you may have joins in your pieces that you could otherwise avoid.
- Determine how big your quitl needs to be. For instance, if your fabric requires 2 yards of a 60" WOF, you would make a quilt sandwich that is 72" (2 yards) x 60"
- Make your quilt sandwich to size- the top layer (quilt coat outer) would be 72 x 60" and your batting and backing piece would be slightly larger
- Quilt as desired
- Layout your pattern pieces on your "quilt" and cut the pieces out
- Don't forget your pocket pieces! You should make these the same way as your other pattern pieces.
- NB: For your quilt back, you can follow either Option 1 or 2 above.
The benefit of this method is you are only making one quilt which may save you some time. However if you have a smaller sewing machine or are not confident in quilting an entire quilt in one piece, you should consider Option 1 or 2 :-)

Not adding pockets? You can skip this step!
So you thought we were ready to assemble- but first we need to do a few things to our pockets (which you hopefully cut out as part of the instructions above. Before we start assembling our quilt coat, we need to insert and finish our pockets !
Option 1: Square or rectangle pockets:
If you are adding pockets that are a square or rectangle (eg not the super large pockets) we need to bind these before attaching them. To do this, we will essentially treat each pocket like a mini quilt and bind it like you would a quilt (you are basically making a pot holder!). Once you have bound it, you can then sew it onto the front pieces of your quilt coat- make sure to add extra stitches at the top to give it some extra strength.

Option 2: Extra large pockets:
For the extra large pockets, we only need to bind the top edge as the other edges will be covered under the quilt coat finishing steps.

Once you have bound the top edge of each of your pockets, you can then attach them to your front quilt coat pieces before assembling your quilt coat.

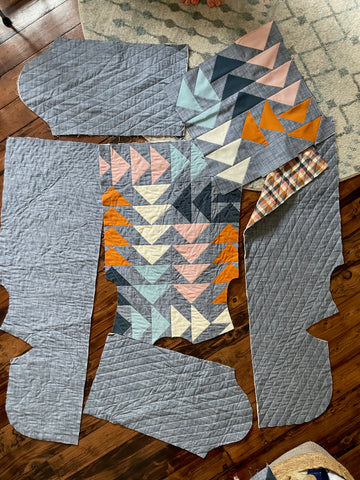
Once you have all your fabric pieces cut and your bound pockets attached (if applicable) , you are ready to assemble. For those nervous garment makers, don't be- this is one of the quickest steps in the whole process!
Patterns often suggest you use a 5/8" or even larger seam allowance. To avoid bulk in your seams, I would recommend using a 3/8" seam allowance.
The only instructions you need to follow in your pattern are how to attach each of the pieces to each other. You can generally disregard any instructions about hemming, interfacing, clipping etc- our binding process will cover off on all of those steps nicely.

We are almost there! You should now have something that looks like this (with pockets)- a functioning quilt coat, but with lots of unfinished seams

(Sorry - this is of another quilt coat- I forgot to take one at this stage of the original!)
Click here for the final steps on finishing your quilt coat.