Pre-washing your fabrics, Practice muslin version and POCKETS!
This tutorial includes the beginning steps for your quilt coat (regardless of which quilt coat you are making). Links for the next steps are included at the end of this post :-)
These are the less exciting steps but are definitely worth the effort long-term :-) They are all optional but highly recommended and I've included some reasons why you may want to consider these steps below. The three steps are:
- Pre-washing your fabric
- Making a practice version from a cheap fabric such as muslin, polypop or calico
- Drafting your pocket pattern

(Side note: if you still need fabrics, I have some quilt coat bundles available or feel free to contact me for a custom bundle!)
Do I really need to pre-wash?
The short answer: Yes!
The long answer: When I am making a normal quilt, I don't ever pre-wash my fabrics and when I did an instagram poll, the vast majority also don't pre-wash their fabrics either! With a normal quilt, most people like the "quilt crinkle" that comes with washing a quilt (resulting from a small amount of shrinkage) and any concerns with colours running can usually be prevented by using colour catchers (if you haven't already tried these, they are amazing!)
However with a quilt coat, we are going to work so hard to make a gorgeous coat that fits us nicely, so we don't want to risk that with a small amount of shrinkage. So for that reason, it's a good idea to pre-wash your fabric (and also consider pre-washing your batting). If you are washing your fabrics together, make sure to use the colour catchers mentioned above.

Do I really need to do this?
The short answer: This one is entirely up to you!
The long answer: I personally didn't make one for my first three quilt coats but that said, I had to do some pretty significant alterations to the first one to get it to be a good fit- and it was pure luck that it worked out! :-)
Update: I made a polypop version for my fourth quilt coat as I was using a different pattern and I'm so glad I did- I was able to adjust the length and size before making the cut on my quilt! Plus bonus: it didn't take that long, I promise!
So here are some reasons why you might want to consider making a practice version first:
- Size: Sizing across quilting patterns varies significantly and sometimes even the guidance doesn't quite match up! For example, according to the measurements on the pattern that I used (Simplicity 8467), I should have made a Simplicity Size 16. However once it was made it was absolutely humongous- and I ended up pulling it apart, and making the pieces a size Simplicity Size 6! Other people I have spoken to have had similar stories.
- Length: You may decide you want a certain length but when you try it on decide its too long- maybe this length doesn't look as good as you expected (I'm speaking from experience here :-)). This allows you to get the length just right without hacking 10 inches from your beautifully quilted fabric
- Design: This is especially relevant for those that are making a "Party all over" or "Mullet (party on the back). You may decide that your back piece needs to be a certain size and make your design fit that size- maybe you decide it would fit 2 quilt blocks perfectly. But if you don't have the size right, this may end up cutting into your gorgeous design. Or maybe you end up cutting two rows of flying geese off (also speaking from experience).
Ok you've convinced me- so how do I make a practice one?
You can use any sort of cheap fabric (muslin, calico, polypop etc). You may also consider using a cheap quilt from Target or Kmart if you want to get a better idea of the drape and how it will hang.
You then attach your pattern pieces to the fabric using either pins or fabric weights as follows:

Then cut out the pieces and sew them together (following the pattern instructions). You don't need to do any of the finishing parts that are outlined in the pattern (eg hemming cuffs or anything like that)- really we are just building a base model to test for size and fit.
When you are sewing it together:
- Seam allowance: Most patterns suggest 5/8" or more but when you are making a quilt coat, you may want to only do a 3/8" or even 1/4" seam to avoid bulk (given we will be sewing quilt pieces together). Whatever you decide to do for your quilt coat, make sure that you do the same for your practice one to ensure consistency across both versions.
- Stitch Length: Consider using a longer stitch length to make it easier to unstitch if you decide to pull it apart to make it smaller/ adjust the length etc. You may also want to unstitch each of the pieces at the end to incorporate any changes into your pattern pieces (eg so you can trace the changes onto your pattern pieces).
Here is my polypop version- it's not going to win any fashion awards :-) As I mentioned above, it was too long, so I cut the length as can be seen by the left hand side.

I then took the pieces I had cut off and put them on top of my pattern pieces and cut the pattern pieces down to size using the fabric I cut from my polypop version- that way I knew they would be exactly the right length for my final quilt coat.


If your quilt coat pattern doesn't have pockets or you don't like the pockets included on the pattern we can now draft a pattern piece to make our pockets.
There are a few pattern options:
1. Large pockets: I included pockets that were 9 x 9" on my first two quilt coats- all you need for this is a 9" x 9" pattern piece- you can either use a cheap fabric or baking paper for this.
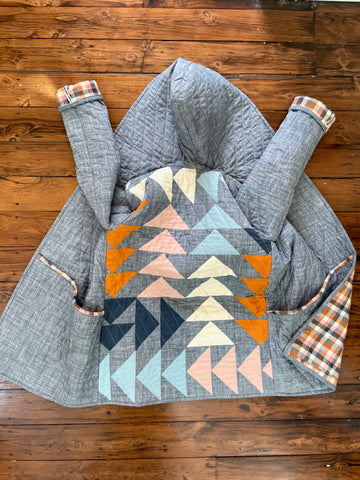
2. Extra large pockets: I made extra large pockets that took up the bottom part of my quilt coat for my hooded quilt coat. The way I made these wasn't very scientific but worked well!
Essentially, I just used a piece of baking paper and shaped it in a way I thought would look good with square corners and a diagonal top. I then placed it over the top of my quilt coat and adjusted the shape accordingly until it matched each of the corners of the quilt coat. This was then used as my template.

For my hooded quilt coat, these are the dimensions of the two sides in case you want to have a similar angle. I haven't included the top and bottom measurements as that will vary by pattern.

If you are on the fence about whether or not to make a practice quilt coat first, maybe this will push you across the line :-)
For my hooded quilt coat, I made extra large pockets but because I hadn't made the practice version first, I wasn't sure how long the quilt coat would be. Therefore, I sewed all my pattern pieces together as I wanted to check the length first which meant that I could only make my pocket pattern piece after it was sewn! So I then had unpick the sides and sew the pockets in once I was happy with them. If you do this as part of your practice version, you will have the pocket size already known which means you can add the pockets to the quilt coat pieces before you sew it up!

Above: Using the very scientific method of using pattern instructions as my template
Once you've completed the above steps (or decided not to.. :-), you are ready to start cutting your fabrics and piecing!
- How to make a quilt coat- the mullet
- How to make a quilt coat- the party all over
- How to make a quilt coat- a little bedazzling
- How to make a quilt coat- the all business