How to make a Quilt Coat- Part 1
How amazing are quilt coats? A gorgeous quilt made into a snuggly coat – it’s one of a kind and super cosy. I’ve made three so far and they are such a fun and satisfying project that I want to make more- so now it’s your turn to make one for yourself!

There is quite a bit of information to cover so here is what we are covering today!
- Timing
- Types of Quilt Coats
- Quilt Coat Pattern Suggestions
- Fabric Requirements
- Frequently Asked Questions
You can find a video which gives a high level introduction as to how to make a quilt coat here- watching this before you start is highly recommended!
Types of Quilt Coats
Here are the types of quilt coats there will be tutorials for:
- “All Business”
One fabric on the outside and one fabric as the lining.
For fabric requirements for the "All Business", click here
For instructions on how to make the "All Business", click here

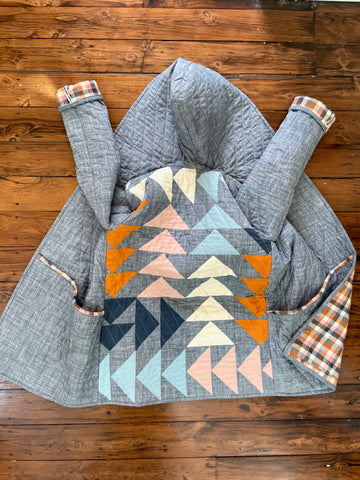
- “The Mullet”
Party on the back, business on the front and arms. The “Party” could be any design of your choice, but I will include some tutorials for using half square triangles (HSTs), squares and flying geese on the back. You can also use an existing quilt (one you have made or a vintage one) or a quilt pattern.
For fabric requirements for "The Mullet", click here.
For instructions on how to make "The Mullet". click here

- “Party all over”
Pattern all over. You can use any design or quilt pattern you like (assuming it is big enough for each of your quilt coat pieces) but I will also include some tutorials for using half square triangles or squares.
For this coat, I used Penelope Handmade's Ebb and Flow Quilt pattern in throw size but added some extra rows to make it fit my coat pattern.

For fabric requirements for the "Party all over", click here
For instructions on how to make the "Party all over", click here

- “A little Bedazzling”
This is the slightly fancier version of the “All Business”- it is mainly one fabric on the outside with a few extra “bedazzled bits” thrown in. I will include a tutorial on how to do this!

For fabric requirements for the "A Little Bedazzling", click here
For instructions on how to make the "A Little Bedazzling". click here

- Quilt Coat Pattern suggestions
In theory, you should be able to use any / most quilt coat patterns but because it’s a quilt coat they will not have the same drape as a normal coat so keep that in mind when choosing.
Here are some pattern suggestions:
- New Look 6536
- New Look 6585
- Simplicity 8467 (this is the one I used as a base for all of my quilt coats however it's proving to be difficult to locate.
- Simplicity 8298
- Wiksten Haori
- Tamarack Jacket (NB: If you are using this pattern, it is already for a quilted coat so you can use these fabric requirements)
- Fabric Requirements
I think this might be the hardest part of the whole quilt coat process! But bear with me- I promise it’s not as hard as it seems.
A little disclaimer: I have tried to be as generic as possible to take into account the various sizing/ types of quilt coats etc, which is why recommendations are quite wide ranging!
General tips:
- If there are any requirements for lining fabric or interfacing you can usually disregard these given we are effectively using a quilt (or quilt pieces)
- You can either use the 45” or 60” WOF- there are pros and cons to using either one
- Using 45” will mean you are making a very thin long quilt
- 60” will mean your quilt you are making will be a bit more square/ even
Directions for determining the amount of fabric you need can be found here:
All quilt coats need binding- you can make your own with the existing fabric to match what you have OR for a pop of contrasting print or colour, Bessie Pearl Textiles makes absolutely STUNNING bias binding - and you can use the code quiltcoat to het 15% off all full price bias tape and quilt binding here.
- Frequently Asked Questions
- Should I prewash my fabrics? Yes! I don't prewash fabrics usually when making a normal quilt but because we will be wearing this, we don't need any shrinkage- so this step is highly recommended! You should also consider pre-washing your batting. You can find more details on this here.
- What sort of tools do I need to make a quilt coat? I have used the following to make my quilt coats (I have added alternatives where possible)
- Rotary cutter, ruler and cutting mat
- A good pair of fabric scissors (if you are a quilter and don't have these, you can use your rotary cutter but the scissors do make things easier!)
- Pins to attach your pattern to your fabric (I love these Sohmo glass head pins or entomology pins and bonus, they come in a gorgeous metal tin!) (you can also use fabric weights if you have these)
- Needle and thread if you decide to hand bind your quilt coat